
OST (Offline Storage Table) is an Outlook file format for Windows associated with Exchange Server. OST is an associated file format, which means if such files get orphaned, there are no standard manual solutions to access them. In this blog, we learn how to export active and orphaned OST files through best-practice methods.
What is an OST File?
Those who use an OST file with Exchange Server know how useful this format is for them. OST comes with one of the biggest advantages of maintaining workflow. In other words, you can access and create emails, calendars, and tasks offline. As the internet connection becomes stable, OST automatically transfers the newly created tasks to Exchange. An OST file can store a complete mailbox.
Disadvantages of OST Files
- An OST is linked to the Exchange or Microsoft 365 account and Outlook profile, so it cannot be opened independently.
- Microsoft 365 doesn’t offer any direct or standard option to import OST data.
- The format is prone to corruption because of the system’s abrupt shutdown, software errors, synchronization issues, and various other technical errors.
- Recovery of corrupted OST files can be difficult, and you may lose important data.
Import OST to Office 365 Using the Manual Methods
You may be surprised to learn that a manual method is available to export OST to Office 365. Here, we are providing the best manual practices to import selective OST data to MS Office 365.
Step 1: Access the Target OST File in Its Original Outlook Profile
Here, access Microsoft Outlook (classic Outlook) and configure the Exchange account with which the desired OST file is created. Let Outlook synchronize and download the mailbox data. Now, follow the given steps.
- Open classic Outlook configured with the active Exchange account.
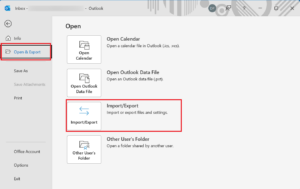
- Click File > Open & Export > Import/Export.
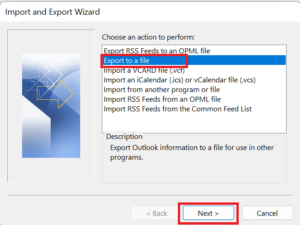
- Select Export to a file and click Next.
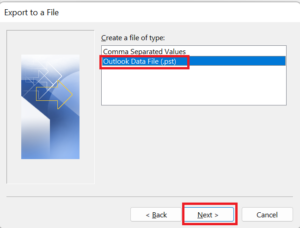
- Choose Outlook Data File (.pst) and click Next.
- Select the specific email account or mailbox folder you want to back up, check Include subfolders, and click Next.
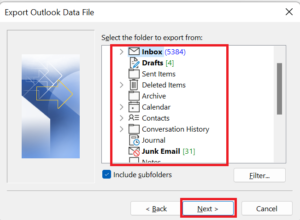
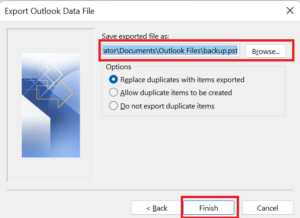
- Click Browse to choose a destination path on your computer, choose how to handle duplicate items, and click Finish.
Step 2: Configure Your Office 365 Account in Outlook
Ensure your target Microsoft Office 365 account is successfully logged in and added to the same classic Outlook profile so Outlook can see the cloud mailbox.
Step 3: Import the PST File into Office 365
- In classic Outlook, go to File Options> Click Open & Export > Import/Export.
- Choose Import from another program or file and then click Next.
- Choose Outlook Data File (.pst) and click Next.
- Browse and choose the PST file that you prepared in step 1.
- Select the radio option: “Import items into the current folder” or choose your Office 365 mailbox from the destination drop-down list, then click Finish.
Limitation of Manual Method
Manual methods require the original Outlook profile where the OST file was created. In other words, you cannot export orphaned OST files using these methods.
- OST files cannot be directly imported into Office 365. You generally need to convert the OST data into a PST file first.
- It is a requirement that Outlook is installed and configured on the system to transfer the OST data to PST.
- Method one is suitable for data backup, while method two is not suitable for data backup.
- The suggested methods are excellent for small mailbox migration under a technician’s observation. If you are a novice, neither of these methods is appropriate.
- They are time-consuming and confusing methods.
- Both methods are not suitable for large-scale migration because large attachments can go missing.
- The following methods don’t guarantee complete migration because of synchronisation issues.
- Folder structure, rules, permissions, and some mailbox-specific settings may not transfer completely.
- Manual methods are usually inefficient for batch data migration.
Direct Way to Upload OST Files to an MS 365 Office Account
When it comes to direct solutions, you have a variety of options to consider. However, a wise move is to choose an automated OST file converter that can export orphaned files, convert entire or specific folders, provide an assurance of accuracy, and support unlimited conversions. ViceVersa OST to Office 365 Converter can meet your conversion goal because it has all the qualities that a professional tool should have. A free trial of this application can be installed on a Windows system to closely monitor its accuracy.
Steps to Import OST to MS 365
- After installing the application, launch it on your system.
- Select the source file (OST file) that you want to move.
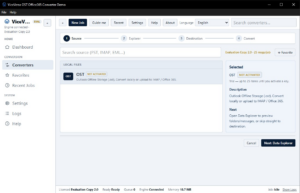
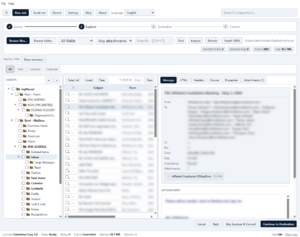
- Get a preview of the uploaded OST file in its preview pane, which displays all mailboxes, contacts, and calendar in tree format. You can check messages and attachments of each item.
- Next, select Office 365 for conversion and provide the required MS account credentials. Press the “Authenticate Me” tab to allow Office 365 to connect with the app for conversion. (While the process is going on, ensure that the internet connection is stable.)
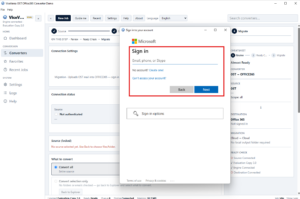
- Select an existing folder or create a new folder for storing data. Finally, press the Export tab to complete the conversion.
Advantages of the ViceVersa OST to Office 365 Converter
- Since it is a standalone program, you don’t need prior installation of Outlook.
- The tool exports both active and orphaned, corrupted, inaccessible OST files.
- Conversion doesn’t need the original Exchange account.
- The tool displays a preview of the uploaded OST file in its preview pane, divided into three sections to provide a detailed preview. Using this feature, you can view OST files and filter specific mailboxes to export. This means you have control over what you want to export.
- The exported data is stored in an existing folder or a new folder, for which the tool allows you to create a folder.
- The free trial allows you to experience the conversion program closely.
Conclusion
By closely analysing the manual and automated solutions, you can decide which option is suitable for you. The manual version is mainly for limited data conversion where you are ready to take the risk of data loss. In contrast, the automated solution is a tool for professionals and those individuals who are not willing to lose a single email. Install the free version of the tool.
FAQs
How can I Import a Large OST File into Office 365?
Ideally, manual conversion can result in data loss when converting a large OST file. Therefore, the best way is to use a dedicated tool. The recommended app exports both small and large OST files with high accuracy.
How to Export Orphaned OST Files to MS Office 365?
For orphaned OST files, there are no standard manual solutions to export data. Hence, the practical solution is an automated tool.